
文/wutongke(简书作者)
原文链接:https://www.aafxw.com/p/4d21341f94ee
这将是一个关于Android Api的系列文章,AntSoft的Android 团队一直紧随技术前沿,在Budapest University of Technology and Economics培训Android技术已经有8年多的时间。公司里有个传统就是每周进行技术分享,这里将介绍一些Android平台上有意思的API。
当前Android已经有了非常多可用的依赖库(Library),但其实Android platform的一些API有些鲜为人知,但非常有用的方法和类,去研究一下这些API是非常有意思的。
我们知道Android API依赖的Java SE API也非常庞大,根据统计,Java SE 8有217个package,4240个方法,而java SE 7有209个package,4024个方法。
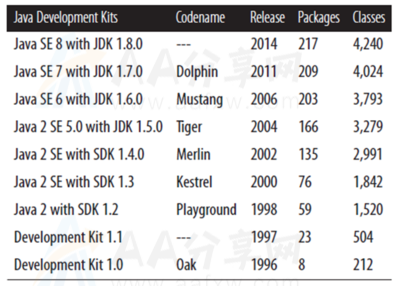
source: Java 8 Pocket Guide book by Robert Liguori, Patricia Liguor
在这个系列文章中,我们将从不同角度展示一些鲜为人知的Android API,并使用这些API写了demo,开源地址:https://github.com/peekler/GDG
demo App中给出的每个API的使用都是在不同的Activity中,从App首页可以进入到不同的API demoActivity。

拼写检查
Android从level 14开始有一个检查拼写的API,可以通过 TextServicesManager使用,从level16开始已经可以甚至可以检查一个完整的句子了。
使用方法非常简单,通过 TextServicesManager可以创建SpellCheckerSession:
TextServicesManager tsm = (TextServicesManager) getSystemService(Context.TEXT_SERVICES_MANAGER_SERVICE);
SpellCheckerSession spellCheckerSession = tsm.newSpellCheckerSession(null, null, this, true
可以通过实现SpellCheckerSessionListener接口得到检查结果:
onGetSuggestions(SentenceSuggestionsInfo[] sentenceSuggestionsInfos)
onGetSentenceSuggestions(SentenceSuggestionsInfo[] sentenceSuggestionsInfos));
SentenceSuggestionsInfo数据中保存了正确的文字、偏移量以及所有相关的信息。

demo地址SpellCheckerActivity
文字识别
这是Google Play Services Vision API中提供的功能,可以通过gradle dependency非常简单的引入到project中,需要注意的是不要引入整个Play Services,因为Play Services非常大,而我们需要的只是其中的一小部分,https://developers.google.com/android/guides/setup中可以找到相关的帮助。
Vision API中包含的服务有:
-
人脸识别
-
条形码扫描
-
文字识别
使用 Text Recognizer API非常简单:

首先,在build.gradle中引入依赖:
compile 'com.google.android.gms:play-services-vision:10.0.1'
然后创建TextRecognizer对象:
TextRecognizer textRecognizer = new TextRecognizer.Builder(context).build();
之后实现 Detector.Processor 接口接口监听结果,得到的结果是TextBlock 数组。
public class OcrDetectorProcessor implements Detector.Processor<TextBlock> {
    @Override
    public void receiveDetections(Detector.Detections<TextBlock> detections) {
        ...
        SparseArray<TextBlock> items = detections.getDetectedItems();
        ...
    }
    @Override
    public void release() {
    }
}
合理地使用 TextRecognizer,一般要自定义包含SurfaceView的View用于在屏幕显示结果。demo地址 OCRActivity , ocr 中有一些帮助类。
TimingLogger
TimingLogger可以很容易地计算两个log信息之间的时间差,如下所示:
D/TAG_MYJOB: MyJob: begin
D/TAG_MYJOB: MyJob: 2002 ms, Phase 1 ready
D/TAG_MYJOB: MyJob: 2002 ms, Phase 2 ready
D/TAG_MYJOB: MyJob: 2001 ms, Phase 3 ready
D/TAG_MYJOB: MyJob: end, 6005 ms
使用TimingLogger:
TimingLogger timings = new TimingLogger("TAG_MYJOB", "MyJob");
然后通过addSplit(…) 方法创建一个 log entry:
timings.addSplit("Phase 1 ready");
当使用dumpToLog()后,log信息就会打印出来:
timings.dumpToLog();
注意要使用TimingLogger, 要设置adb命令是Tag可用:
setprop log.tag.TAG_MYJOB VERBOSE
demo地址:TimingLoggerActivity.
截屏
在某些情况下,截屏非常有用。也有一些第三方库如 Falcon实现这个功能,从level 21开始 MediaProjection可以实时获取屏幕内容和系统声音信息流。
qi,有时使用标准的Android API通过getWindow()非常简单地把屏幕内容保存为Bitmap:
View viewRoot = getWindow().getDecorView().getRootView();
viewRoot.setDrawingCacheEnabled(true);
Bitmap screenShotAsBitmap = Bitmap.createBitmap(viewRoot.getDrawingCache());
viewRoot.setDrawingCacheEnabled(false);
// use screenShotAsBitmap as you need

demo地址:ScreenCaptureActivity.
PDF创建
从level 19开始Android支持本地内容生成PDF文件。
首先创建一个PageInfonew PdfDocument.PageInfo.Builder(w,h,pageNum).create(),然后使用PDFDocument中的
;startPage([pageInfo])就可以创建一个PDF文件了。
以下的代码创建了一个demo.pdf文件:
public void createPdfFromCurrentScreen() {
    new Thread() {
        public void run() {
            // Get the directory for the app's private pictures directory.
            final File file = new File(
                    Environment.getExternalStorageDirectory(), "demo.pdf");
            if (file.exists ()) {
                file.delete ();
            }
            FileOutputStream out = null;
            try {
                out = new FileOutputStream(file);
                PdfDocument document = new PdfDocument();
                Point windowSize = new Point();
                getWindowManager().getDefaultDisplay().getSize(windowSize);
                PdfDocument.PageInfo pageInfo =
                        new PdfDocument.PageInfo.Builder(
                        windowSize.x, windowSize.y, 1).create();
                PdfDocument.Page page = document.startPage(pageInfo);
                View content = getWindow().getDecorView();
                content.draw(page.getCanvas());
                document.finishPage(page);
                document.writeTo(out);
                document.close();
                out.flush();
                runOnUiThread(new Runnable() {
                    @Override
                    public void run() {
                        Toast.makeText(PDFCreateActivity.this, "File created: "+file.getAbsolutePath(), Toast.LENGTH_LONG).show();
                    }
                });
            } catch (Exception e) {
                Log.d("TAG_PDF", "File was not created: "+e.getMessage());
            } finally {
                try {
                    out.close();
                } catch (IOException e) {
                    e.printStackTrace();
                }
            }
        }
    }.start();
}
感谢阅读。
此篇是译文,原文地址 Discovering the Android API – Part 1
Other
贴个不定期更新的公众号,欢迎交流: